
I was gonna save this tutorial until tomorrow but it is so pretty...I couldn't wait!!
This is a tutorial for a wreath made from an old dictionary. It is the perfect accent to any bare wall, cupboard door, mirror, old window, front door, or... well this thing would look great anywhere you put it! It was simple to make, although it looks pretty trying. Hopefully, after the tutorial, you will agree with me on the simplicity of this project!

Ok, so lets get started. You will need only a few things:

an old book
pins
a wreath, either straw or foam will work
burlap
hot glue gun
scissors


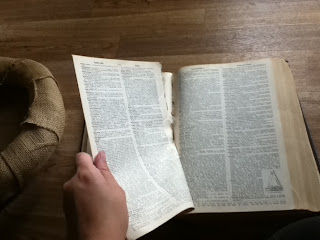

This is what your pages should look like once you have folded them....

...and after you have pulled the pages apart.

7.) Now, it's time to get to work...begin pinning the torn end of your folded paper to the outer edge of the wreath. For this first layer, you will want to slightly overlap as you pin. Go all the way around the outer edge until you meet up with the first piece of paper pinned.
pins
a wreath, either straw or foam will work
burlap
hot glue gun
scissors
(These first 4 steps aren't necessarily required. I bought some old wreaths from the local Christian Ministry and they were all covered with old fabric or ribbon. I wanted to cover mine with burlap but the actual wreath itself will not show.)
1.) Cut the burlap into strips. It doesn't matter how long or how wide, this will be used to wrap around the wreath. Like I said, this part of the wreath will not show.
1.) Cut the burlap into strips. It doesn't matter how long or how wide, this will be used to wrap around the wreath. Like I said, this part of the wreath will not show.

2.) Take your hot glue gun and put a strip of hot glue on an end of the burlap.

3.) Press the burlap (where you put the strip of glue) to the wreath.

4.) You will now wrap the burlap around and around. If you have 1 long piece of burlap, then just wrap it around the wreath until the wreath is covered, gluing the end of the strip of burlap to the wreath. If you have several short pieces of burlap, then glue the strip, wrap, and glue the end piece. Then repeat until the wreath is covered.

5.) Now grab your old book. The more faded and yellow the pages, the better this wreath will look! I recently went to a flea market and found a booth full of nothing but old books. The book I am using happens to be a dictionary...from 1947! Flea markets and yard sales are great places to find treasures like this! Begin tearing out pages, very carefully. Oh, and if your husband is a lover of old books, don't let him see you! This just about started World War 3 at my house!! You can tear out 1 at a time or you can get a little more bold and tear out several pages at once. This is probably a better idea since its going to take a whole lot of pages!

4.) You will now wrap the burlap around and around. If you have 1 long piece of burlap, then just wrap it around the wreath until the wreath is covered, gluing the end of the strip of burlap to the wreath. If you have several short pieces of burlap, then glue the strip, wrap, and glue the end piece. Then repeat until the wreath is covered.

5.) Now grab your old book. The more faded and yellow the pages, the better this wreath will look! I recently went to a flea market and found a booth full of nothing but old books. The book I am using happens to be a dictionary...from 1947! Flea markets and yard sales are great places to find treasures like this! Begin tearing out pages, very carefully. Oh, and if your husband is a lover of old books, don't let him see you! This just about started World War 3 at my house!! You can tear out 1 at a time or you can get a little more bold and tear out several pages at once. This is probably a better idea since its going to take a whole lot of pages!

6.) Begin folding your pages, accordion style. This is another one of those times where you will want to use more than 1 sheet of paper. I would take a stack, 5 or so sheets, and fold them together.

This is what your pages should look like once you have folded them....

...and after you have pulled the pages apart.

7.) Now, it's time to get to work...begin pinning the torn end of your folded paper to the outer edge of the wreath. For this first layer, you will want to slightly overlap as you pin. Go all the way around the outer edge until you meet up with the first piece of paper pinned.

8.) Now, coming down about 1/3 to 1/2 of an inch, begin pinning your second layer of folded pages. It is best to pin each of these pages between the 2 from the previous layer. The gives the wreath a little more dimension and breaks up the gaps.

9.) Continue pinning all the way around. Then begin your third layer, again pinning each of these pages between the 2 from the previous layer.

This is what your wreath should look like after the third layer of pages are pinned to the wreath.

10.) Now begin pinning your fourth and final layer, and again pinning each of these pages between the 2 from the previous layer. This layer will almost be touching the table or floor beneath your wreath. This might get a little tricky just because of all the folded paper everywhere, but just be patient...you are almost finished!

...keep pinning....

At Last!! The last layer of pages will all fall inward. If they need a little help, just "fluff" the pages, carefully, by pulling the folds toward the middle. We're almost done. All we need to do to finish is add something to hang the wreath.

11.) Cut 2 long strips of burlap. With the first strip, you will tie it into a bow, like so...

...and with the other strip, just fold it in half.

12.) Place a big dot of hot glue onto the top fold of the strip and attach the bow.

13.) Now place another really big dot of glue on the back of the wreath. Attach the 2 strips of burlap here. Your wreath may be a little heavy so you can also push a few pins to keep it in place. If you have any extra burlap hanging down, you can cut it or leave it, either way, it won't show.

All you have to do now is find a place to hang it!!


This is such a beautiful project, and wouldn't you agree with me on the simplicity?! It's the perfect wreath for fall, or Christmas. It would go nice in a shabby-chic themed home, a country or a beach home...like I said earlier, it would go great anywhere! It would even make for some nice reading on the wall in the bathroom! :)
...Happy Crafting!


